diy

SHE Makes A Lace Crown

Wednesday, December 27, 2017


Hello my crafty friends! Today I'm sharing my DIY lace crown. I'm a little embarrassed to post this because of the pictures, but I'm going to anyway. Just keep in mind that I was in a hurry and didn't have time to clean my craft room before this so there is stuff everywhere!

This is probably one of the easiest, but cutest crafts! If you have, or know, a little girl this is a must!!! (This also works if you’re a self-claimed princess like me – I plan to make myself one.) I made this lace crown for one of my best friend’s bachelorette party this past weekend. She was so cute!
All you need is some lace (I bought a half-yard), fabric stiffener, and hot glue. Optional items are paint, glitter, and something round to shape around (I used an old jumbo wine bottle).


Lay your lace out on a piece of wax paper and cover it in the fabric stiffener. (Helpful hint: the kind I bought pours out so I had to brush it on. I HIGHLY recommend getting stiffener that comes with a spray top) Now this needs to dry. I did this step right before I went to bed one night so it was able to have all night to dry. 


Optional step – if you’re planning on painting your crown keep reading, if not you can skip ahead. I painted hers with gold paint. I wanted to make sure I kept the details of the lace though. So I grabbed my spray bottle (you can pick one up for a dollar at most stores), I poured some paint in there and mixed in just a little bit of water. I then sprayed it onto the lace. It gave it color without weighing it down with paint. I also sprinkled some glitter on while the paint was wet!


Once your stiffener (and paint) is dry trim any off the bottom if you need it shorter. I did this in a few cuts so I wouldn't go too short (ignore my bike and my socks...*embarrassed*). Now shape it into a circle as wide as you want (like I said, I used an old wine bottle) and hot glue the ends together.


Ta-Da! You’re now a princess! We secured hers to her head by sticking bobby pins through the holes in the lace.


Did you make one? I’d love to see it and/or here your tips. Let me know in the comments!

xo Courtney


SHE Makes A Lace Crown

Wednesday, December 27, 2017

SHE Likes Big Bows...

Monday, December 11, 2017


.. And I can not lie. What's up y'all! Today I'm showing you how to make a big bow for the top of your tree! I LOVE making these. I usually make a new one each year and have made a few for the tree at my office. This could be scaled down to a smaller bow if that is what you're needing.

Let's get started...

First you need your ribbon. The key here is WIRED EDGE RIBBON. If the most perfect ribbon that you've ever seen doesn't say its wired then put it down and walk away. I'm not kidding! Without the wire your bow will fall flat and be a sad sad bow... 

This year I stuck with two colors, a red and a glitter gold, but I usually do three.


For this next part it is helpful to have an extra set of arms. It isn't necessary (I did it last year alone), but I promise you it is much easier and quicker. Have your helper hold their arms out to their sides - isn't Hubs just the best helper? Don't go any wider than this - been there done that. It makes a floppy bow, even with the wire, and like we said earlier floppy = sad.

Laying the ribbons on top of each other begin wrapping around and around. This part is personal preference - you can wrap as many times as you want. As you see in the picture I wrapped somewhere between six and eight times and have a nice full bow. You can wrap all the way to the end of the ribbon if you want, I've done it before. You end up with a tighter bow because there are more loops.


Once you've wrapped till your heart is happy, you're ready for the next step. If you didn't use the whole roll cut the ribbon to where it's even with the loops. In the picture above I cut it by Hubs hand, you don't need all of that hanging off the side.

Now take it and fold in half.


There in the middle, cut a slit on each side. Not too deep or it will fall apart!


With the left over ribbon cut a strip about eight inches or so. It'll need to be long enough to tie around your loops and then to tie it to the top of your tree.

So like I just said - tie it (and knot it!) around the middle where you just cut the slits. This is the point of cutting those slits so you can tie it good and tight.


Now for the fun part! It is time to start fluffing! Start by grabbing the top loop on one side and pulling it out. Continue for each of the loops and then do the other side.


See?


Once you have all your loops pulled out work your way through the bow moving loops around and shaping it until you are happy with it!


Now you're done! Just tie to the top of your tree and start decorating!


I hope you loved this tutorial as much as I loved making the bow.

Did you make one? Send me pictures - I'd LOVE to see it!

xo Courtney


SHE Likes Big Bows...

Monday, December 11, 2017

SHE Decorates Last Minute

Monday, November 20, 2017


Happy Thanksgiving Week! I absolutely love Thanksgiving (probably because I love to eat!)

For today's post I went to Pinterest (none of these images are my own) and scoped out some of my favorite DIY decorations. Hopefully this will help you out if you're in a last minute bind!

These bottles are great and easy! Simply grab some old wine bottles, or beer bottles if you're looking for something smaller. Spray paint them the color of your choice. Once dry, write on them with a paint pen and tie some twine around the top. Ta-Da!

image via Pinterest


Next up - some simple candles. Grab a pack of fake leaves and use twine or ribbon to tie around candles. You could even use candles you already have. Easy and cheap!

image via Pinterest


This one I love! Use those old mason jar lids (you can buy some if you don't have a stock pile) and spray paint them orange. Tie them together and stick some cinnamon sticks in the middle. Hello adorable pumpkin!


image via Pinterest


This is absolutely adorable and a must (in my opinion) if your family has kids. All you need is a pumpkin and a sharpie. You could use a orange pumpkin if you can't find a white one, or paint it if you're really wanting white!


image via Pinterest


Last but not least - GOLD. My favorite! I drool over all things gold. Pick some pumpkins (real or fake), pinecones, anything really, and a can of gold spray paint.

image via Pinterest


What are some of your favorite fall decorations that are easy?


xo Courtney 

SHE Decorates Last Minute

Monday, November 20, 2017

SHE Thinks Easter (Last Minute)

Thursday, April 13, 2017

Hey y'all! So as I'm sure you know, Easter is Sunday. AKA three days away! 

In true slacker form, I've not done a thing as far as decoration, crafts, or baking! Oops! 

I quickly scanned Pinterest for "quick easy Easter" - below are some cute ideas I found that I thought I'd share with you!

So how cute is this bunny garland? I love the little cotton ball tails. 

Image via Pinterest

These eggs are a great way to add a little extra decoration without having plastic eggs laying around. This would also be fun for the kids to help with if they were a little older!

Image via Pinterest

I think this button egg is my favorite! So cute, so easy, and so many possibilities!! 

Image via Pinterest

I love this snack because it's festive, sweet (peeps), and healthy (fruit). A win-win for everyone!

Image via Pinterest
Finally - you can't go wrong with Rice Krispy's! Add some food coloring to the melted marshmallows before you add the cereal and shape like eggs for these cute and yummy treats!

Image via Pinterest


Hope this helped get the creative juices flowing if you're like me and haven't done a thing. 

Happy Easter!

xo Courtney

SHE Thinks Easter (Last Minute)

Thursday, April 13, 2017

SHE Makes Glittery Pumpkins

Wednesday, October 12, 2016


I went to a local fall festival this past weekend.  They had these fabulous silver and gold pumpkins.  I just had to have them!  I love the silver and white pumpkins.  They just remind me of Cinderella and Prince Charming.  We are doing a bridal shower this weekend and needed something to go with my silver pumpkin. So, I got out the glitter and made these other pumpkins.  How many of  you have the traditional colored pumpkins at your house?  Well, I do too!  So I made a few gold and bronze colored pumpkins too.  


I haven't added flowers to them yet. Sorry!   Trying to decide where I want them and what I want them to hold.  I think I may add candy to one and put a vase inside the other to hold my silverware. Or a mason jar with fresh flowers??  I can't decide!

 Anyway,  here is how  I made these pumpkins.

First, I bought the plastic pumpkins for about $1. 


Then, I spray painted the inside and outside with a coat of silver/gray paint.  I didn't want the bright blue or orange to show on the inside.  I was thinking I would add a candle or flowers..or even fill with my silverware.  

The next step is get rid of the face on the plastic pumpkin.  I used Plaster of Paris.  (You can buy a tub of this at Michaels or Hobby Lobby). When you mix it be careful.  Read the label!  Watch out and do not ingest the dust when mixing it.  I mixed mine in a throw away styrofoam bowl and used a plastic spoon.  This stuff sets up like concrete.  


Put a little in the face indentions and spread and smooth it out.  It is like icing a cake.  Work fast because the Plaster of Paris dries fast.  Don't worry if it is not perfect.  Look at real pumpkins.  They have "spots" where they have been laying on the ground.  


Once this dries, you can paint the whole surface.  You can use chalk paint, craft paint, but I used a sample of Valspar's wall paint.  (It was the color I wanted and I had it from a previous project.  And it went on fabulously.). You can get the sample size at your local hardware store for under $5 in any color.  

Now, this is the part that would be scary to most perfectionist. Your pumpkins won't be perfect.  But as soon as you get the paint on to help with the imperfections I immediately sprinkled on Epsom Salt and glitter.  It gives it dimension and hides flaws. Plus who doesn't like glitter....  Now this needs to dry.  Once this is totally dry you need to spray a sealer on top!    Then you can add sand and candles,   or you could go with flowers.  

I had the hurricane globes from another project. I did add glitter to the top of my sand.  (I covered the candle with a cupcake liner while I sprinkled the glitter so it wouldn't get on the candle.) 

I hope you make a Glittery Pumpkin!  I would love to see how yours turns out.  I want to know what colors you use and how you finish it out...candles...or flowers...or silverware holder!  I am curious!  
Lisa B


SHE Makes Glittery Pumpkins

Wednesday, October 12, 2016

StrawNana Peanut Butter Dog Treats {National Dog Day}

Friday, August 26, 2016

Hey y'all! Today is National Dog Day, so naturally it's my favorite day (behind Christmas and my birthday). Spoiling my baby is my favorite thing to do and the other night I made him some homemade treats! Since it's National Dog Day, I knew I had to share the recipe. But first, some pics of my baby boy. (note: he'll be three next week but he's still my puppy/baby)

"Hi, I'm Mack B. Philpott. I love my mom and dad, sticks bigger than I am, the snow, and snuggling on the couch. I was also a super cute puppy!"


Okay, now that we're done drooling over my baby, let's get to the recipe. These are literally the easiest things you'll ever make and they're frozen - perfect for these hot days we've been having.  

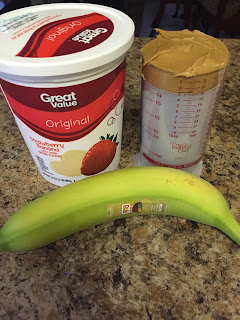
You'll need 3 tbsp of peanut butter, 1 banana, and 32oz of yogurt, I used strawberry banana yogurt. I'll admit, this was by accident. I was on the phone, saw original on the lid and thought it was plain. But I personally believe they turned out better than they would have if they were made with plain yogurt. 


Slice up your banana and throw it all in the blender and mix it up really well.


Pour in ice cube trays (or if you're fancy use silicon trays shaped like paw prints!)


I filled up three!


Somebody was anxiously waiting!


Freeze for two-ish hours and you're ready to go!


They were a hit!


So to wrap that up...

32oz Strawberry Banana Yogurt
1 Banana
3 Tablespoons Peanut Butter

Blend it all together, pour in ice cube trays, and freeze for two hours. 

I hope your babies love this as much as mine did.

xo Courtney

StrawNana Peanut Butter Dog Treats {National Dog Day}

Friday, August 26, 2016

Latest Instagrams

© SHE Degree. Design by FCD.